¶ Server Setup | CO:OP
CO:OP servers allow you to connect your in-game singleplayer saves to other players. Server host AND joining player's will need to read this guide, If your only joining a co-op server don't do the server host steps
This page is split up between Host (The person who makes the server), Joining (The player's joining the host's server), and Both (Host and joining), Read all of your respective sections.
Please do not confuse CO:OP servers with SDK servers. SDK servers are very similar as they share the same underlying code, however SDKs are setup in a much more complex manner.
¶ (Both) Requirements
- Same requirements as the nvmp getting-started page.
¶ (Both) Things to avoid
- Skilled perk, It's currently bugged.
- If you or your joining player's have joined the public RADD server, they will have 5 NVMP .esp files, These are meant to only be used on RADD they can and will cause issues in co-op, it's recommended to delete/move them, They are auto downloaded upon joining RADD again, The file names are (NVMP_-_Breezy.esp , NVMP_-_Jr.esp , NVMP_-_Pres.esp , NVMP_-_Wachter.esp , NVMP-Q.esp) Located here:
- Steam:
- C:\Program Files (x86)\Steam\steamapps\common\Fallout New Vegas\data
- GoG:
- C:\GOG Galaxy\Games\Fallout New Vegas\data
- Steam:
- Hamachi (It's just worst than Radmin VPN in every way)
¶ (Both) Things to note
- All saves are stored on the individual player's computer, So in co-op you will see all of your saves.
- Do NOT use your RADD save's in co-op since it will make them invalid.
¶ (Both) Updating your client/server
- Updating your server is the same way as updating your client.
- If you used to NVMP Automatic installer a simple launcher and server restart should update it (You can also use the manual zip file method below if needed)
- If you used the NVMP Manual zip files, You will need to download a new build _release_client.zip here, then extract the folder, and place it's contents into your FO:NV main game folder.
- Steam:
- C:\Program Files (x86)\Steam\steamapps\common\Fallout New Vegas\data
- GoG:
- C:\GOG Galaxy\Games\Fallout New Vegas\data
¶ (Both) Loot load order tutorial
- Make sure everyone does these 3 steps every time you add a new mod to your game.
- (Host) If the server is open then close it during this Loot tutorial
1. Right click the program LOOT -> Run as administrator -> IF prompted regarding a ambiguous load order then click Game -> Fix ambiguous Load Order
3. Ensure it says Fallout: New Vegas on the top left dropdown
4. Click Update Masterlist -> Sort Plugins -> Apply sorted load order
¶ (Host) Instructions
¶ (Host) Step 1. Allowing player's to connect
For other players to join your server, they connect with Connect via IP button on the NVMP Launcher but they will use a different IP depending on your method of allowing their connection.
- If they are connecting through the internet you need to port forward the port 27015 with UDP & TCP (Google “How to port forward”) then they use your Public IP (Google “What's my IP”) Make sure its ending in :27015 so it'll be something like this 25.127.230.205:27015 , then hit Join.
- If you do not want to port forward (or can't) you can use the software Radmin VPN (Tutorial below).
- If they are connecting locally from the same network they can use your Local IPv4 IP (Tutorial below).
¶ (Host) Radmin VPN tutorial:
- In your FO:NV folder launch the nvmp_storyserver.exe
- Download , Install, and launch Radmin VPN → If the power button is red then click it on.
- Click Network → Create Network → Make a Network name and Password → Create
- Click System → Firewall exceptions → Add application → Click the one ending in nvmp_storyserver.exe
- Open your NVMP launcher → Connect via IP and paste in localhost:27015 → Join.
¶ (Host) Local IPv4 IP tutorial:
1. Search in windows and open the program Command Prompt
2. Type in ipconfig → hit enter → Scroll until you find your network adapter
If you have a physical wired internet: Ethernet adapter Ethernet
If you have wireless internet: Wireless LAN adapter Wi-Fi
If you have wireless internet: Ethernet adapter Wireless LAN adapter Wi-Fi
3. Copy the numbers after IPv4 Address . . . → Add :27015 to the end → Anyone on your local network can paste this into Connect via IP on the NVMP launcher. → Join
- Example IP: 192.168.0.25:27015
¶ (Host) Step 2. Launching and connecting to your server
- To start the server you can either run nvmp_storyserver.exe within your Fallout: New Vegas folder, or in the NVMP launcher by clicking Launch Local Server.
- After this a console window will appear, If any immediate errors are found they will be highlighted in the console window in red or yellow and if you don't know what they mean or how to fix them, then join the discord and ask for help in #nvmp-support.
- The message "GameSettings is being purged as it is outdated!" Is normal, you can safely ignore it!
3.To join your own server you click Connect via IP in the NV:MP launcher and use the IP localhost:27015
¶ (Host) Step 3. Installing Content Mods
- To install mods for your server, you install them normally just like for singleplayer
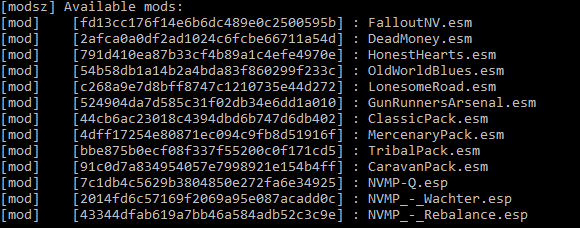
- When the server is launched, a list of available mods detected as installed are printed.
- Make sure if you update any mods, that all player's connecting to your server have the same versions of those mods.
- All players must have any DLC and installed mods the server host has and have the same LOOT load order
¶ (Joining player) Instructions
¶ Step 1. Joining a server
- Depending on how the server host allows connections to their server, You will need to receive the IP from them or if using Radmin VPN read the tutorial below
- In your FO:NV folder → Launch the nvmp_launcher.exe → Click Connect via IP → Enter the IP you were given
¶ (Joining player) Radmin VPN tutorial:
- Download , Install, and launch Radmin VPN → If the power button is red then click it on.
- Click Network → Join network → Private Network then type in the Network name and Password the server host set → Join.
- Right click the server host's name → Copy IP Address paste it into Connect via IP button on the NVMP launcher and add :27015 at the end → Join
- Example IP: 25.127.230.205:27015
¶ (Host) Server Configuration Options
The server.cfg file is created on server start up, and populates with default values used. You can edit the file whilst the server is shut down, and changes will re-apply on server start up.
| Category | Name | Description | Options | Default Value |
|---|---|---|---|---|
| Network | Hostname | Sets which hostname is listened to by the game server. This can be overrode by command line arguments (see below). | DNS resolvable host | * (any) |
| Network | Port | Sets which port the server will listen on. This can be overrode by command line arguments (see below). | 0-65,535 (if valid) | 27015 |
| Server | EnableConsole | If enabled, players can use console to run cheats. | 0 or 1 | 0 (disabled) |
| Server | EnableSaving | [Recommended only for Development] If enabled, players can save their progress locally. |
0 or 1 | 1 (enabled) |
| Server | EnableVATS | If enables, players can use VATS in combat. | 0 or 1 | 0 (disabled) |
| Server | Difficulty | Globally overrides the difficulty in use by each player. | Ranges from 0 for Very Easy, to 4 for Very Hard. | 2 (Normal) |
| Server | IsHardcore | Globally overrides the hardcore mode in use by each player. | 0 or 1 | 0 (disabled) |
¶ (Host) Command Line Arguments
Command line arguments can be set if you run the server through a command line window, or through a bat file. They can override certain properties, or set more intensive options on the server.
| Name | Description | Options | Default Value |
|---|---|---|---|
| -profile | [Recommended only for Development] Sets the minimum ms (millisecond) a server frame can be in terms of performance. If it is exceeded, then hot spots marked manually are printed to console |
any floating point number | 1.0 |
| -unrestricted | Reduces restrictions of mod lists received by players. By default servers are running fully restricted, meaning all players require the same mods and plugins (Data folder, NVSE folder) listed with the same checksums (to validate they are the correct files as the server is running in). | all checksums |
if unset: none if set: all |
| -port | Overrides which port the server will listen on instead of what port is read from server.cfg | 0-65,535 (if valid) | |
| -quiet | Asserts or errors will instead not produce message boxes that require user interaction. | ||
| -hostname | Overrides which hostname the server will listen on instead of what hostname is read from server.cfg | DNS resolvable host | |
| -secure_logs | Forces any logging that provides sensitive information (such as player IP address) to use alternative non-sensitive values, or none at all. IPs are instead listed as connection UID values. |